Wednesday, July 20, 2011

HowTo: Blogger dashboard

Hi everyone! Here's the breakdown of your blog's dashboard. This shouldn't be confused with your Blogger dashboard--same concept, but the latter is an overview of all your blogs, while the first is the overview of a specific blog. 
Sorry for the cramped writing--if it's too confusing let me know and I'll fix it. Somehow.

Friday, July 1, 2011

So. The Blogger in Draft dashboard has had yet another makeover; the new layout is rather similar to the last--so similar, in fact, that I re-loaded the page because I thought it wasn't working properly.  (Am I talking like a British person? If so it's because I've been reading a lot of Jane Austen lately. :)
Anyway, here's the disambiguation of the newest dashboard:

Coming up next: A new PerkUp post, and a GadgetGuru one after that.
Also, what would you bloggers (new or otherwise) like to see? What button have you been staring at for the past months, too scared to press in case it blows up your hard drive (I know the feeling)? Post a comment on this post, or in the box on the right sidebar. I'll answer anything as best as I can (or ask someone who does know).
Thanks for reading! :)
-M Gabrielle


Monday, June 6, 2011

New dashboard alert!

Hi everyone! In case you hadn't noticed, the Blogger website has had a complete overhaul in the past few weeks. As far as I can tell, the new design came out in the past few days. I, being quite behind on homework, packing for a semi-vacation, and editing my main character's perfect boyfriend out of my novel (which is due on the 30th--gulp!), haven't been on Blogger since last Thursday--I know, it's shameful! I hope none of you will ever neglect your blogs for so long.


Anyway, in case you'd logged on to write an update on your change of kitty wet food and found a new grey-and-orange Blogger dashboard, no panicking! :) Yes, you knew I'd say that. If you're willing to click around a bit, everything is basically the same. Some colors have changed, and a couple of buttons have been added, deleted or moved to different places, it's true. If you've already figured everything out and want to send feedback, click here. Yay for you! If you want to use the old version of Blogger in Draft until I post a tutorial (which will almost certainly be after the 26th, and most likely around the 1st or 2nd of July because of my novel), I appreciate your dedication to my blog and thank you by giving you the link here.
 If it doesn't work, find the name of your blog on the left of your new blogger dashboard and click the "dashboard" underneath it. I know, it's confusing; too many dashboards.

Next click the "Settings" tab on the bottom. 


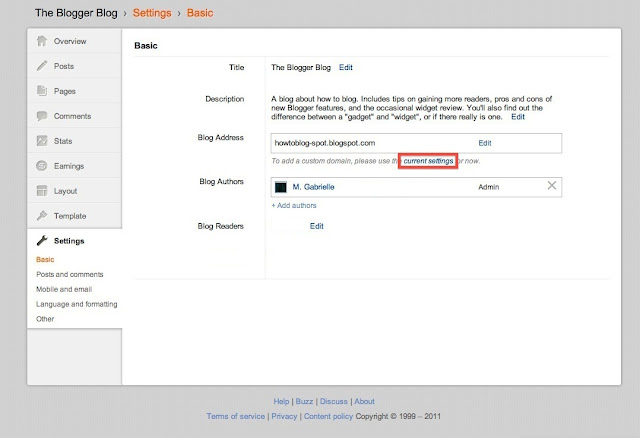
Then click on the "current settings" link under your blog address.

This will take you to the Basic settings page in Blogger in Draft. I'm sure there's a more efficient way to get there, but this works. (If you do find a better way, please drop me a comment!)


I hope that mini-tutorial will hold you until July. (Summer! Yay!) Now, if you'll excuse me, I have to go edit some writing for a poetry class.

M. Gabrielle

Friday, May 27, 2011

Sorry I haven't posted in so long! (No, really, I am.)
Here's a blog tutorial for the Formatting page of the Settings tab. I should cover Publishing next, because my plan was to start with Basic and work right, but I have no idea how the Custom Domain thing works and I don't want to gloss over it, because there are only two buttons on the Publishing page. Anyway, here's my latest
Blog Tutorial: Settings: Formatting

To start, go to your Blogger dashboard.

(If you usually use Blogger.com, don't panic, in case you wanted to. I think I've said this before, but in case you're a new reader, (yay! Hello! *waves*) the only difference between Blogger and Blogger in Draft is that new features are launched first in Blogger in Draft so the Blogger elves can test them (the features, not the elves) on us Draft users. That's why I might be talking about something that you can't find on your own Blogger page.)

Find the name of the blog you want to format, and click Settings.
Next click Formatting (next to Publishing).


Click on the images to get a bigger picture (if you can't read the text).

Sunday, May 15, 2011

NetWorkIt: The Unpaper Trail


The Unpaper Trail

Step One: Read more.
Get out into the blogging world. Find out what other people are buzzing about, get inspired, and see what's going on out there. Start with a friend's blog, or if all the people you know are technically challenged, try the Blogs of Note list on Blogger.com. Or, go to blogsearch.google.com and search a topic that you're interested in, such as "Cooking".

Step Two: Comment
Comment, comment, comment! On other blogs, that is. I can't stress this enough. (Or can I?) Why? If you got a comment on your blog, what would you do? Yeah, yeah, after jumping up and down and screaming "I got a comment!" Right. Click on the commenter. "Who is this friendly person who deigned to comment on my lowly blog? Hey, their site is kind of cool!" Exactly. Now you're getting it! So, if you comment on someone's blog, that's what can happen. 

Note: Some people don't check the comments on their blog, and some aren't interested in being friendly. Don't be one of those people! (Disregard the last sentence if you get more than thirty comments a day on your blog.)

Step Three: Follow
When you find a blog you're interested in, follow it! Almost everyone has a "Follower" gadget installed somewhere on their blog. (If you do not, put one on your blog as soon as you finish this post. That's an order!) If they are follower-gadget-less, don't panic! Go up to the top of their blog, and find the little colored bar along the top. On the left will be a search box. a little orange "B" and then the word "Follow". Click it, and proceed to follow as usual. 
Make sure that you've listed your blog as public on your profile (HowTo tutorial for that coming soon), and don't change your follower settings to private on any blog you're following. That way people can see your profile on the blog you're following. When they click you, they'll see your blog and (hopefully) click on it. Voila!

Step Four: Promote.
Shamelessly.
Put a link to your blog on Facebook (or MySpace, or whatever social networking site you use). Better yet, add the Facebook Share gadget so people can post your blog to their Facebook pages.
Add the Yahoo Buzz Gadget. True, the word "Yahoo" sounds a little like the air coming out of a big purple balloon, but people still use it. Lots of them.
Put the Subscribe gadget up so people can easily access your RSS feed. (This just means they can get an email with your post in it each time you publish.)
Click here to see a tutorial for adding these gadgets.

Step Four and a Half: Profiles.
This step can be a little complicated. You're welcome to skip it; however, it's brought me many readers.
If you're a member of any website, it will usually let you post a link where people can reach you. I have two fairly popular sites listed below--if you're not on Google or Goodreads, skip those paragraphs.

Let's start with Google profiles. Go to Google.com. Click on Settings (in the top right corner) and then Google Account Settings. Click on Edit Profile--it's on the top left, right under your name. Scroll down to Add Custom Links To My Profiles, under Links. Open your blog in a new browser and copy and paste the link into the Url, then type the name of your blog into the Link Name box. Save Changes. 

Now try Goodreads. Go to goodreads.com. Put your mouse over Hi (your name here), in the top right corner. Next click on My Profile. Click the Edit Profile button, which is next to (your name here)'s Profile. Scroll down to My Website, under Age and Birthday Privacy. Copy and paste your blog URL into the box, and Save Changes. 

Most sites have a place to put your blog or website. People browsing your profile will see the link and click on it, probably because they're nosy. Or maybe they just like you. (Is there really any difference?)

Step Five: Invite.
Go to a blog you're following. Find their follower gadget. Click Options--it's right under your name. Click Invite Friends. From here you can add your Google, Facebook, or Yahoo friends, or invite them by email. They'll get an invitation to your blog, and come see what you're up to. 

NetWorkIt is a part of PerkUp--it has ideas and instructions for nudging your blog off your adoring knee and into Blogger land.

Thursday, May 5, 2011

PerkUp: Part 2

Part 2 of How To Spruce Up Your Blog And Attract More Readers, (from now on called PerkUp) featuring a cool background (Yes, thank you, I did finish my essay. I got a 91 on it. :) I am currently not working on my research paper and French homework).

So. You put in a hit counter. Good job. If you haven't (tsk tsk!) click here.

Next, we're (I hate it when people use the royal we. And why is it called the "royal" we anyway?) I am covering how to make people who find your blog STAY there, instead of just bouncing off on to Facebook or their email. If your posts are funny, interesting, entertaining, striking, refreshing, or riveting (sorry if I left out your favorite adjective- drop me a comment and I'll add it) that helps a lot, but the funny-ness or interesting-ness of the rest of your blog is what can make people think your blog is worth reading. I'm not saying to add every single gadget that catches your eye, make your text highlighter yellow and type in all caps; simplicity can be perfect, but please I'm begging you just look at the options before writing it off as too hard.

Instructions for all of the following can be found here. These are suggestions, not tutorials.

    ◊ Check out the Templates section to change the style of your post background.

   ◊ Find a background or solid color you like. You can now upload your own images--the bigger the better--on template designer, so no whining that you can't get anything suitable.

    ◊ Consider changing the color of your blog title (mine is The Blogger Blog, if you're not familiar with the terminology yet) and description (the text right below the blog title).

    ◊ Pick out your favorite font for the title, description, and posts.

    ◊ Add an image behind your blog text. (Click here for an example--why yes, it is my other blog!)

    ◊ Spice up your gadgets by selecting a new layout.

And speaking of gadgets… fun stuff to add! I'll be starting a new thread (in addition to PerkUp, NetWorkIt and Blog Tutorials [otherwise known as HowTo]) reviewing gadgets called GadgetGuru (in which I will explain the difference between a gadget and a widget--come on, you know you've been wondering).


So, here are a few of my favorite gadgets and where to find them. For the "Add an HTML gadget" tutorial, click here.

The SocialVibe gadget: Found at http://www.socialvibe.com/, or by searching SocialVibe in the Add A Gadget screen.
Why to add it: To use the SovialVibe gadget, you choose a cause, such as Charity Water (making sure people all over the world have clean water to drink) Surfrider foundation (contributing to keeping beaches and oceans clean) and World Wildlife Fund (delivering science-based solutions to preserve near-extinct species and habitats). You add the cause gadget to your page, and when people click on it, they answer a series of questions (Ex, what is your favorite PowerBar flavor) provided by advertisers. The advertisers then donate money to your chosen cause through SocialVibe. For each person who answers questions on your blog, you get (in the Charity: Water case) 183 gallons of water added to the total on your gadget.

The Abowman Hamster, of course. Found at Abowman.com.
Why to add it: You can customize the color of everything from the hamster wheel to it's food. This hamster wanders around its gadget looking cute, occasionally running on its wheel. Click once on the gadget to give it one piece of food, two times for two pieces, etc. Click the wheel to make it run. Abowman has a a fish gadget too--it's basically the same except without the wheel.

The Blogroll gadget: Found at Blogger.com, by clicking Add A Gadget and scrolling down to Blogroll.
Why to add it: Although it's a default Blogger gadget, which are usually utilitarian and not terribly exciting, Blogroll makes a pretty cool addition. Not only do your readers get the inside scoop onto why you're not posting (because you're looking at all the other cool blogs out there-including mine!) they'll click on things that catch their eye--e.g., Allie's Vintage Valley blog. Although this does draw people away from your page, Allie will want to see where her new readers are getting referred to, bringing her back to you. Hopefully Allie will then return the favor and mention you on The Vintage Valley. Voila--karma. This is venturing into the networking section, so I'll move on-- even though I'm sure you're all dying to read it.

Count Up Timer: Found through Widgetbox.
Why to add it: There are thousands of Count Up timers; if you're good with HTML (I'm not) you could make your own, but this one is right here. It's pretty simple--just set a date, and it tells you how much time has passed since then. You can change what it says also; default is "x days, x hours, x minutes, x seconds have gone by since the day I was born" but everything is replaceable.

Cue Widgetbox rant, please. Oh wait! No. No rants on Widgetbox yet... Excuse me while I write it down in another window.

Okay, back now. GadgetGuru is almost ready for it's kickoff! Yay! I was considering making GadgetGuru, HowTo, NetWorkIt and PerkUp their own separate blogs, but someone's already claimed GadgetGuru. Plus I really don't need four more blogs; I update the ones I have rarely enough.

Wednesday, January 5, 2011

Blog Tutorial: New Feature: Mobile Templates!

To turn on mobile templates, go to your Draft homepage- draft.blogger.com. (This tutorial will not work unless you start at your Draft homepage--it has not been released on the main Blogger site yet.) 
If you see a pop-up that says "Turn On Mobile Templates" next to the blog you'd like to enable them for, click on it (make sure it's the right blog).

Otherwise, find the name of the blog you want to turn on the templates for and click "Settings".
Next, click "Email and Mobile".


Click the "Turn On Mobile Templates" button...


...and then the orange "Save Settings" button at the bottom of the page.


You're done!


Now, why would you want to turn on mobile templates?
I knew that was coming. If a hypothetical person, I'll call her Amy--if Amy had a SmartPhone (iPhone, Droid, etc) and she used it for blog surfing a lot, it would take a while for the blogs to load (especially if they had big images and stuff-like my Blogger Blog). After Amy waited for the page to finish loading, she'd have to zoom in to be able to read the text, and would probably be frustrated by the time it took to find exactly what she wanted to read.

If, however, Amy chose to enable Mobile Templates, all backgrounds and gadgets would be eliminated, allowing Amy's SmartPhone to load your blog very quickly and Amy to see your blog posts in a comprehensive format (as well as a readable font size). (If you're concerned about the size of pictures in your posts, they're scaled down to a thumbnail size. Amy can click on the photos  to see them at full size.)

Thank you, Amy.

Wow, that sounded like a really corny commercial. But it's true. I know when I'm looking at blog on my (*cough* mother's) iPhone, I get fed up with waiting for stuff to load. Well, I used to- I gave up on blogs a while ago. It's way easier to stay updated with your favorite blogs if they're using mobile templates.

One more thing-readers will still see your regular blog if they're using a full sized computer.