So, you've got a blog. You've emailed all your friends about it, and they've dutifully made an account so they can be your follower. You've even made your blog public in the hopes that some lost soul traipsing about the big wide internet will come and read it. I know, it's a scary thought.
But now you're over the thrilling brand-new-blog scent (I know, isn't it lovely?) and you want some readers. So where do you get them?
I have two answers to this: number one is to perk up your blog so that it will catch people's eyes; and number two networking.
How To Perk Up Your Blog: (I always forget, is "to" capitalized if you put it in a title?) I like to start with a single widget: the hit counter. This is probably the most basic widget out there. All it does is every time someone new comes to your blog, it adds another number to the little list next to your post. Of course, there are tons of different counters out there, and tons of ways to customize them.
You can either copy and paste the html text below into a gadget (see the HTML gadget post) or get your own counter. I like http://www.e-zeeinternet.com/.
From that website, you'll have to answer these questions:
Page Counter Will Be Placed On: paste in the link to your blog. You don't need to put in a "www" before it.
Number of digits to show: (Adds Leading Zeros) exactly what it sounds like. I recombined the 5 digit option, in case you ever hit the featured list on Blogger. (when you do, don't forget to tell everyone how you got started on Blogger! :)
Do You Want To Count: Unique visitors counts each computer that visits your blog as a separate person. Pageviews will tell you how many times people have looked at your blog. Unique visitors is recommended. (Yes, you can add a Blogger-provided gadget for this and see it all on the stats page, but the feature where your pageviews aren't tracked is broken again. Plus you don't have an option for unique visitors on Blogger.)
The last two questions you can answer based on your own knowledge of your blog, hopefully. Now scroll down to the bottom of the page and click the "GET COUNTER CODE!" button.
Copy the text and paste it into your "HTML" gadget back on your "Design" page. If you don't know how to do this, see the "HTML widget" post over HERE.
Here's a simple counter code if you don't want to find your own right now.
<!-- Counter Code START --><a href="http://www.e-zeeinternet.com/" target="_blank"><img src="http://www.e-zeeinternet.com/count.php?page=569682&style=default&nbdigits=4" alt="HTML Hit Counter" border="0" ></a><br><a href="http://www.e-zeeinternet.com/" title="HTML Hit Counter" target="_blank" style="font-family: Geneva, Arial, Helvetica, sans-serif; font-size: 10px; color: #000000; text-decoration: none;">HTML Hit Counter</a><!-- Counter Code END -->
Click Save.
Congratulations! You just finished Step One of How To Perk Up Your Blog. Now go over to "New Post" and write about it! Don't forget to link back to me... :)
Part 2, which just might feature a cool background, will be out as soon as I finish an essay.
Be back soon!
Sunday, December 5, 2010
Create an HTML gadget
Start at your blogger dashboard. Find the name of the blog you want to add a gadget to, then click Design.


Settings page: Basic settings
This post covers everything in the Basic part of your settings page.
If you can't read the text on the images, click the picture to get a bigger version. 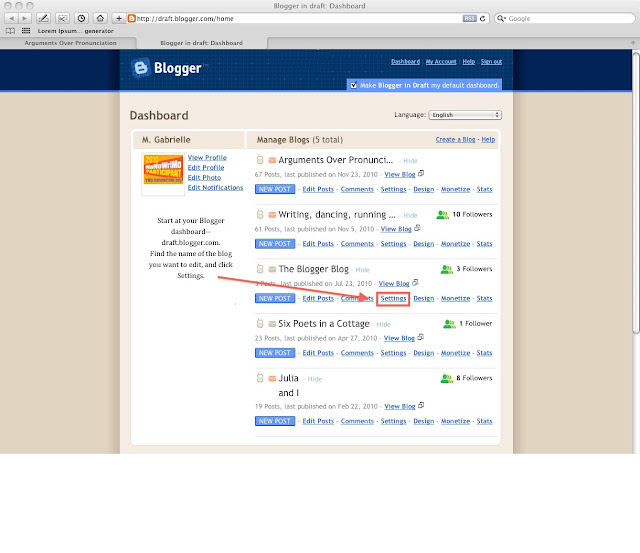


Friday, July 23, 2010
Blogger Tutorial: New Feature: the Share Button
To get started, go to your Blogger dashboard (blogger.com).
 |
| Find the name of the blog you want to add the Share Button to (ex, The Blogger Blog, then click Design under that blog title. |
 |
| Next, click 'Edit' under 'Blog Posts'. |
 |
| Click the checkmark next to 'Show Share Buttons', then scroll down to the bottom of the page and click 'Save'. You're done. There's an ever-expanding pool of non-Blogger ways to share your blog, including buttons that you paste directly into your posts,widgets to put on your sidebar, links from Facebook, etc. So why use the Blogger one? For me, the Blogger "Share Buttons" are better for two reasons-they're more convenient (you don't have to find them, mess around with the settings, and copy and paste the HTML code onto your blog; plus they appear at the bottom of each post no matter what) and they're more reliable (interactive third party gadgets tend to malfunction constantly). Although the "Share Buttons" are pretty basic and you can't customize them, I find that when I there's a large selection of sites to include in my gadget (the basics such as Twitter and Facebook, as well as the less used StumbleUpon and digg-the list goes on and on) I either get overwhelmed and quit or add so many sites that my computer crashes. Either way, the Blogger button is easier. If you have a high-traffic blog or you're connected on some lesser-known sites, however, I would recommend adding the "Share Buttons" to your blog as well as a more detailed third-party widget. My favorites are AddtoAny, AddThis, and ShareThis, mostly because of their formatting and options. |
Monday, June 21, 2010
Blog Tutorial: Template Designer
 |
| This is your Blogger Dashboard. To get to your Dashboard, go to Blogger.com. Find the name of the blog you want, then click Try It Now on the pop-up or Design to get started with Template Designer. |
 |
| Next, click the Template Designer button. |
 |
| This is Template Designer. The first tab, Templates, enables you to change the kind of background your posts and widgets are on. I have my posts on a white background, but not my gadgets (or widgets). If I wanted everything to be on a transparent background, I would click Picture Window. You can change your background image in the next tab. Don't forget to click the arrow to see more layouts. Next, click on Background. |
 |
| Here you can change the colors on your page. (Individual colors and fonts of posts, titles, etc. can be changed in the Advanced tab at the bottom left.) If you want to use a pre-made theme, click the colored boxes to see which one you like best (recommended); otherwise you can click the box directly under "Main color theme" to customize it. Note: it's best to pick out your background image (explained in the next screen) and then change your colors to go with the picture. |
 |
| Here you can change your background image. Click the tabs (abstract, the arts, etc.) to see different background pictures- don't forget to scroll down to the bottom! If you want your background to be a solid color, click "No Image" (highlighted in blue), then pick the color you want (explained in the previous screen). When you find the image you want, click on it, then click "Done". |
 |
| Here you can change the layout of gadgets on your page. For example, if you wanted all your gadgets at the bottom and top of your page, you would click the layout with a red border in the picture. If you wanted one column of gadgets on each side of your posts, you'd click the one beneath it. NOTE: changing your layout will re-arrange your gadgets. |
 |
| Here you can choose how many columns of gadgets you want in your footer. |
 |
| Here you can change the width of parts of your blog by dragging the sliders, or typing in a number in the boxes next of the sliders. Keep in mind that the width of pictures, videos, and other things you may want to post, as well as the width of your gadgets. Also, some people's monitors might be to small too small to fit the entire blog on their screen. |
 |
| This is the last part of Template Designer. Here you can change the fonts and colors of parts of your blog, such as backgrounds, text in your posts, and the titles of your gadgets. Note: you can change the fonts and colors of individual posts while you are writing them. What specific tabs (page text, backgrounds, etc.) do will be explained in a separate post. Another note: when you click on Page Text (or background, etc.) the part of the page that will be affected by changes you make in that screen will be highlighted by a red checked border. |
Friday, June 4, 2010
Create a new post

To undo or re-do the last few changes you've made to your post, click the two arrows at the far left. Note: You have to highlight the text you want to change the font, color, or size on, make bold or italic, or add a strikethrough to.
Click the F for a list of fonts, then click the name of the font you want.
Click the different sized T's to change the size of highlighted text.
Click B or I to make your text Bold or Italic.
The ABC with a line through adds a strikethrough to your highlighted text.
Click the A with a black rectangle under it for a list of colors, click a colored square to change your text color.
The icon next to the A can be clicked to change your post background color.
Select some text and click Link to make words clickable.
Click the tiny picture icon to upload a picture.
Click the movie icon to upload a movie.
Click the ripped-in-half page to insert a Text Break. A text break will display the words "read more" where it is inserted, and the text below the break will be hidden. When "read more" is clicked, the full post will be displayed.
Click the different sized lines to make your text stick to the right or left, or be centered or justified.
Click the 1 2 3 to insert a numbered list
Click the three dots to insert a bulleted list.
Click the " sign to make text quoted- it will be indented.
Click the T with an X to remove any formatting, such as color or font changes.
Click the ABC to to a spell check, and the red book to look up a word in the dictionary.
Click Post Options (in the blue box) for a few more settings. Note: These will all remain at default unless you change them; you don't have to do anything to them unless you want to customize the settings.
If you don't want people to be able to comment on this post, click "Don't Allow" under "Reader comments".
If you want a space to appear where you hit "return" or "enter" in your post, click "Press "enter" for line breaks" (recommended) under "Edit HTML Line Breaks". If you click "Use <br /> tags", you'll have to use the HTML tag for "enter" (<br />) every time you want to have a break in the text of your post.
If you are planning on writing a technical blog, click "Show HTML literally"(not recommended for regular bloggers) under "Compose Settings". It will show tags you've typed instead of interpreting them(ex, show the <br /> tag instead of putting a space in your text as if you'd hit return).
If you want the post to automatically say it was posted when you hit "publish post", click "Automatic" under "Post date and time". If you click "scheduled at", you can have your post be published at any date in the future, or say it was published on any day in the past.
Labels help you and your blog readers find posts. For example, if you took a trip to France and were writing about it, you would put "France" or "Trip to France" in the Label box. People who visited your blog could search for posts labeled "France" and find them easily.
Click Add Location to tell your readers where you are. Note: Your location may not appear on your finished post depending on your post settings. (To change this, go to the layout/design tab, click Edit in the Blog post box, and check the box by Location.)
The "Save Now" button saves your post as a draft. It will be automatically saved periodically.
Click "Preview" to see how your post will look on your blog.
When your post is how you want it to be, click "Publish Post".

Subscribe to:
Posts (Atom)